Getting Ready for Hunting Season
There is a point every year when hunting season stops feeling like something off in the distance and starts feeling close. Tags are sitting on the counter, maps are being studied, trail cameras are getting checked, ammunition is being counted, and gear that has been sitting in the safe or garage suddenly starts finding its way onto the workbench.
For me, one of the biggest signs that hunting season is getting close is cleaning day.
I am not talking about wiping the dust off a rifle and calling it good. I am talking about pulling the rifles and shotguns out, going through them, cleaning the barrels, checking screws, inspecting the optics, cleaning the binoculars, and making sure everything is ready before I ever step onto the range.
Because the worst time to discover a problem with your hunting setup is when an animal is standing in front of you.
Cleaning day is also one of those hunting traditions that doesn’t get enough credit. We talk about scouting, shooting, butchering, cooking, and hunting, but preparation is part of the hunt too. Sitting at the workbench with a rifle in front of you, a cleaning kit spread across the table, and the smell of burgers hitting the grill outside is when the season starts becoming real.
So we’re going to cover both.
Clean guns. Clean glass. A confirmed zero. And a big venison Mushroom & Swiss burger waiting for you when the work is done.
Cleaning Your Rifles and Shotguns
Every firearm is a mechanical tool, and like every tool we depend on, it needs maintenance. Hunting firearms have an especially rough life. They get carried through rain, snow, dust, mud, brush, humidity, and temperature changes. They get handled with sweaty hands, leaned against trees, laid across tailgates, and sometimes spend an entire season riding around in a truck.
Then, somehow, we expect them to work perfectly when the moment of truth arrives.
Regular cleaning and inspection help protect the firearm from corrosion and give you an opportunity to catch problems before they become problems in the field. It isn’t just about making a gun look good. It is about reliability.
Cleaning also gives you a chance to inspect the entire setup. Look for rust. Check for loose hardware. Look over the sling and attachment points. Inspect the stock for cracks or damage. Make sure your optic hasn’t shifted. Look for anything that seems different from the last time you handled the firearm.
You don’t need an entire gunsmithing shop to properly maintain your hunting firearms either. A simple cleaning setup will handle most of what hunters need.
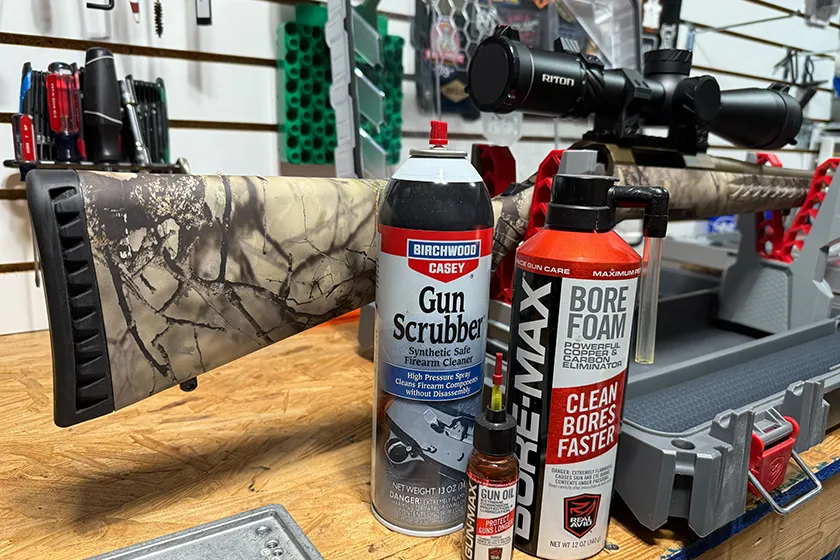
A basic firearm cleaning kit should include:
- A quality one-piece cleaning rod or bore snake
- Bore guide for rifles when appropriate
- Proper caliber or gauge brushes
- Cleaning patches
- Patch jag
- Bore solvent
- Gun oil or manufacturer-recommended lubricant
- Nylon utility brush or old toothbrush
- Cotton swabs
- Microfiber cloths
- Gunsmithing screwdriver or bit set
- Cleaning mat
- Flashlight
Before doing any cleaning, completely unload the firearm and remove all ammunition from the immediate work area. Visually and physically verify the chamber is empty. Follow the firearm manufacturer’s instructions for disassembly and maintenance because not every firearm is designed to be cleaned or lubricated the same way.
With rifles, I like to focus on consistency more than trying to make the bore look like it just came off the factory floor. Depending on the rifle, ammunition, and amount of shooting, carbon and copper fouling can accumulate in the bore. A good solvent and properly sized patches and brushes can help remove that buildup without damaging the barrel.
Whenever possible, clean a rifle barrel from the chamber toward the muzzle. Avoid repeatedly dragging dirty material back through the bore, and be careful around the crown. The crown is a small part of the rifle that can have a big influence on accuracy.
One of the biggest mistakes people make is using too much oil. More isn’t necessarily better. Excess lubricant can collect dust and grime, and oil left inside the bore can create inconsistencies when the rifle is fired. After cleaning, you generally want metal surfaces protected with a light film of the appropriate product, not dripping wet.
Shotguns require the same attention, especially hunting guns that see waterfowl, turkey, dove, or upland seasons. Shotgun barrels can accumulate powder residue, plastic wad fouling, moisture, and debris. Remove the barrel according to the manufacturer’s instructions, clean the bore with the correct gauge brush or cleaning system, and inspect the action.
Semi-automatic shotguns deserve extra attention because carbon and debris can collect around the action and operating components. The exact cleaning procedure depends heavily on the firearm, so this is one area where reading the owner’s manual matters.
A few simple habits make firearm maintenance much easier:
- Clean moisture from a firearm as soon as possible after a wet hunt.
- Don’t assume a gun is clean because it hasn’t been fired recently.
- Check action screws, optic mounts, and sling hardware during cleaning.
- Keep oil and solvents away from ammunition.
- Use tools that properly fit screws rather than whatever screwdriver happens to be nearby.
- Record anything unusual you notice so you can check it again at the range.
- If something appears damaged or unsafe, have a qualified gunsmith inspect it.
Cleaning day isn’t about seeing how fast you can get through the safe. Take your time. Put on some music, fire up the grill, and actually look at the equipment you’re trusting on your hunt.
Don’t Forget the Glass
Hunters spend thousands of dollars on rifles, scopes, binoculars, and spotting scopes, then clean the glass with the bottom of their T-shirt.
Don’t do that.
Optics are precision equipment, and the exterior lens surfaces are treated with coatings designed to improve light transmission, reduce glare, and provide a clearer image. Dirt, dust, fingerprints, dried water spots, and oils can reduce optical performance, while improper cleaning can potentially damage those coatings.
The first rule of cleaning optics is simple: remove loose debris before you start rubbing the lens.
If there is dust or grit sitting on the glass and you immediately start wiping it around, that debris can act like an abrasive. Start with a lens blower or a clean, optics-safe brush to remove loose particles. Once the surface is free of debris, use an optics-approved lens cleaner and clean microfiber lens cloth.
For riflescopes, clean both the objective and ocular lenses. This is also the perfect time to inspect the scope itself. Look at the rings and bases. Check for obvious movement or damage. Inspect adjustment caps and the exterior body. Make sure everything looks exactly how it should before heading to the range.

Your binoculars deserve the same attention, maybe even more. On many hunts, I spend far more time looking through binoculars than through a riflescope. Dust, sweat, eyelashes, fingerprints, rain, and debris slowly accumulate on the lenses until you don’t realize how dirty they actually are.
Clean each lens carefully, then check the focus wheel, eyecups, hinge, neck strap, harness connections, and lens covers. If your binoculars live inside a chest harness, clean the inside of the harness too. There is no point putting freshly cleaned glass back into a pouch filled with a season’s worth of dust.
Keep a small optics cleaning kit in your pack or truck with:
- Lens blower
- Soft optics brush
- Lens-safe cleaning solution
- Clean microfiber lens cloth
- Individually wrapped lens wipes approved for coated optics
Avoid household glass cleaners, paper towels, napkins, and random pieces of clothing. A few dollars worth of proper cleaning supplies can help protect optics that may have cost hundreds or thousands of dollars.
There is another advantage to cleaning optics before the season. It forces you to actually inspect them. Maybe a scope ring has loosened. Maybe a binocular eyecup is damaged. Maybe the harness is starting to tear. Maybe you discover something that would have otherwise become a problem halfway through your hunt.
That is really what preseason cleaning is about. Finding little problems while you still have time to fix them.
Cleaning Is Only Half the Job, Now Go Confirm Your Zero
One of the biggest mistakes a hunter can make is cleaning a rifle, putting it back into the safe, and assuming everything is exactly where it was last season.
Before hunting with that rifle, go to the range and confirm it.
Even if you never removed the optic, checking zero gives you confidence that the entire system is still functioning correctly. The rifle may have been bumped. A mount could have loosened. You might have changed ammunition. The rifle might simply shoot differently from a freshly cleaned bore than it does after a few rounds.
This is also why I don’t like sight-in day to happen the evening before leaving for a hunt.
Give yourself time.
Start at a shorter distance if necessary to confirm the rifle is on paper, then move to your normal zero distance. Use the same ammunition you intend to hunt with whenever possible. Once you have confirmed zero, shoot from realistic hunting positions too.
A bench is great for checking the rifle.
It doesn’t necessarily tell you what the hunter can do.
Shoot kneeling. Shoot sitting. Shoot off shooting sticks. Shoot from your pack. If you hunt from blinds, practice using the type of rest you expect to have available. If you are heading west and expect longer shots, practice building stable positions instead of assuming you’ll magically figure it out when a buck appears across a canyon.
Your range day should answer one simple question:
Do I trust this rifle, this ammunition, this optic, and myself when hunting season arrives?
If the answer isn’t yes, keep working.
Then, when the guns are clean and the range work is done, it is time to clean something else out.
The freezer.
Venison Mushroom & Swiss Burgers

There is something fitting about eating last year’s deer while preparing for this year’s season. A package of ground venison isn’t just something taking up room in the freezer. It is the end of a story that started months earlier, and cleaning day or range day is the perfect excuse to put it to use.
One of my favorites is a big, messy Venison Mushroom & Swiss Burger.
Venison is incredibly lean, which is great on the plate, but that lack of fat can work against you when making burgers. For this recipe, I like combining ground wild game with a little wild boar. The added fat and flavor help create a juicier burger without covering up the venison.
Wild Game Burger Patties
Ingredients:
- 2 pounds ground wild game meat, such as venison, elk, or moose
- 1/2 pound ground wild boar or bacon
- 2 tablespoons minced garlic
- 1 tablespoon Worcestershire sauce
- 1/4 cup minced onion
- 1/2 tablespoon cracked black pepper
- 1 teaspoon paprika
- 1 teaspoon sea salt
- 1 teaspoon garlic powder
Add the wild game and wild boar to a large bowl along with the garlic, Worcestershire, onion, pepper, paprika, salt, and garlic powder. Mix everything until combined, but don’t overwork the meat.
Take roughly a baseball-sized handful of the meat mixture and gently roll it into a ball. Place it on parchment paper and press it into a patty, using your other hand to shape the sides. Continue until all of the patties have been formed.
Now comes one of the most important parts.
Put the patties into the refrigerator for about 30 minutes before cooking.
This helps the patties firm up and hold together better once they hit the grill. It also gives you plenty of time to finish cleaning that shotgun or wiping down your binoculars.
Preheat your grill to high heat. Place the burgers on the hot grill and leave them alone long enough to develop a good crust before flipping. Add the Swiss cheese after the flip and cook the patties to a safe internal temperature appropriate for the meats you’re using. If your grind includes wild boar or other wild pig, make sure it reaches the recommended safe internal temperature for wild game.
Pull the burgers from the grill, loosely cover them, and let them rest while you make the mushrooms.
Garlic Butter Mushrooms
Ingredients:
- 1 pound mushrooms, sliced
- 1 teaspoon minced garlic
- 1/4 teaspoon salt
- 3 tablespoons butter
- 1/4 teaspoon cracked black pepper
Melt the butter in a skillet over medium heat. Add the garlic and cook for about 30 seconds, just until it becomes fragrant. Add the mushrooms, salt, and cracked pepper.
Cook for approximately 3 to 5 minutes, or until the mushrooms soften, darken, and soak up all that garlic butter goodness.
Don’t rush the mushrooms. You want them cooked down and concentrated, not raw mushrooms piled onto a burger.
Build the Burger
Now comes the fun part.
Grab your favorite buns and start stacking:
Bottom bun, garlic mayo, Venison & Wild Boar patty, melted Swiss cheese, garlic butter mushrooms, leaf lettuce, another swipe of garlic mayo, top bun.
For the garlic mayo, I like mixing roasted or smoked mashed garlic directly into mayonnaise. Keep it simple. The burger already has plenty going on, and that smoky garlic flavor works perfectly with venison, Swiss, and mushrooms.
If you’re cooking these for a cleaning day with a couple buddies, form the patties the night before and keep them refrigerated. Have the mushrooms sliced, garlic mayo mixed, and everything ready to go. Once the firearms are cleaned, fire up the grill.
For a range day, make the burgers when you get home.
There is something pretty hard to beat about spending a morning confirming your rifle, smelling gunpowder, punching paper, and then coming home to throw venison burgers on the grill.
Check out more From Field to Plate on social media: Facebook/Instagram/YouTube/X